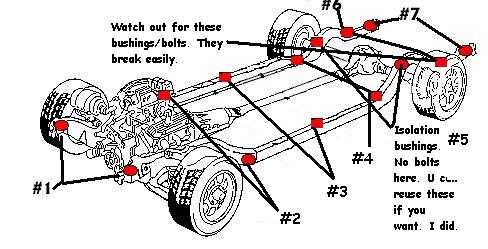
This diagram will show the body bushing points courtesy of www.gnttype.org and modified by me since there are differences. - Thank you...
Just taking all the stuff off the front of the engine and all around. Have to get everything detached... Disconnect a/c at firewall and engine bay wiring harness at firewall. Also disconnect the a/c lines at the condensor. Disconnect the vacuum hoses, engine ground straps and throttle linkage. Disconnect the e-brake cable and pull it through the front. There is a clip where the cable threads through frame that you will have to disconnect. Also disco the speedo cable. Oh you are going to have to take the bumpers off. The front bumper is attached to the header panel and you have to be real careful about taking them out. They are 10mm but if they are frozen you will break or crack the header panel where they bolt into so soak them, A LOT....


You are going to have to pull the radiator and fan assembly and shroud.

Here the nose is finally off. There are bolts attaching the fenders to the firewall and bulkhead of the body tub. There are bolts on the left and right side under the fender right at the door seam. On the nose picture below you can see the tabs at the back of the fenders. They bolt to the bulkhead/firewall.


Here you can see one of the body mounts on the front firewall. Your best bet is to soak all the body bolts in wd40 or penetrating oil before removing them on a car this old.

Some of these body bolts are/were a nightmare. You might have to burn some out and some of them broke and one we had to go into the trunk and cut the floor above the mount to cut the bolt out as shown below. The diamond shaped piece is attached in there and is where the body bolt is threaded into. If this happens you are going to have to weld this piece back or put something else in there.

If you find you have a hole like this on your body after you take the bolt/mount out you are going to have to do some welding and fabricating here. I didn't have to do this because this hole is on the blue body and this didn't happen to the red body.

TIP: Watch out for rust holes in the floor when you are burning out the bushings.

This is what happens when you use the torch and don't know there is a rot hole when you are burning out the bushing! Fire extinguishers are a good thing!
Lifting the body;
Here we have the body completely unbolted. We lifted the car from the frame first. We positioned jack stands on the body lip/seams and let the chassis down. TIP: On a 3rd gen there is a driveshaft strap that MUST be removed. It's bolted to the body. We found out the hard way and messed up a u-joint.
The we repositioned the lift arms and placed the lifting pads minus the rubber mounts under the body lip/seams and lifted the body straight up. As in the picture below.

You will also have to remove the steering shaft at the steering box. This isn't too hard since the shaft is designed to slide. But after 24 years this one didn't slide to easily and a BFH had to be used. It eventually let go.

This is the result of a hard days work...


After you finish on one car just do the same exact thing to the donor vehicle. Vehicle 2 came apart a lot easier since the red car only had 40,000 original miles.

Tip: Remove the gas tanks too... Makes it easier...

The same procedure on the red car as the blue car...
Prep. your chassis with whatever you like. I used por-15...


I don't have any pictures of dropping the body on the frame but putting the body down on the frame is just as easy. We were moving so fast we just didn't have time for pictures. Just roll the chassis you are putting with the body you want underneath and just lower the frame down till it lines up. What I did was put a floor jack under the front cross member and the rear so we can easily maneuver it under the body to line it up. We also used some big pry bars to make some minor adjustments.
Below is the result of all your hard work. I couldn't get #6 bolts cause they broke and I will have to get into the trunk and cut the floor. That's for another day. But #6 bolts get a lot of abuse since they are directly behind the rear tires. Lots of crud, dirt and water get thrown at them over the years.

Well that's pretty much it for now, but you get the idea...
Thanks for checking it out....
![]()